The OR Surgery Schedule Viewer may be customized in several different ways: the screen size and position may be changed; the columns may be sorted, resized, reordered, and hidden; the cases may be grouped by OR, or the the cases may be alternated with different row colors, or no grouping or alternate row colors may be applied; the status bar colors may be changed; and the display may be configured to auto-advance to the next day's schedule, and to display the next day with cases.
With the exception of the screen size and position, and the sorting and resizing of columns, all of the the customization settings are configured on the Application Settings dialog, which may be invoked by selecting the Settings option in the View menu.
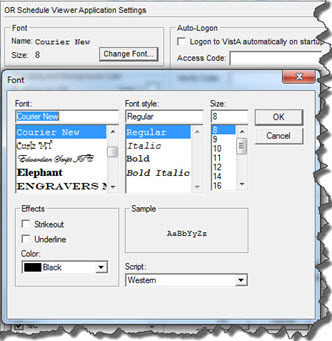
Changing the Font
To change the font in which surgery cases are displayed, click the Change Font... button in the Application Settings dialog and use the Font dialog to change the font face, style, color, and size.
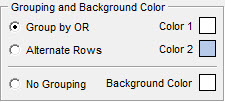
Selecting the Grouping and Background Color
Three options exist for grouping and coloring rows.
1. Select Group by OR in the section shown in the screen capture below to have the display group the cases by OR and colored using the colors indicated in the color boxes to the right.
2. Select Alternate Rows to have the software display the cases with alternating background colors.
3. Select No Grouping to have all the cases displayed with the same background color.
The colors can be selected by clicking the color box and using the color selection dialog to pick the grouping, alternating, or background color.
Selecting the Columns for Display
Columns may be hidden by deselecting the checkboxes to the left of the column names. Unchecked column names will not appear in the surgery schedule display.
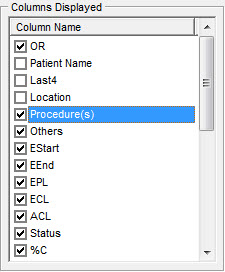
Reordering the Columns in the Display
Columns may be reordered as follows:
1. In the Columns Displayed section of the Application Settings dialog (see screen capture above), click on a column name with the left mouse button.
2. While holding the left mouse button down, drag the column name up or down in the list to the desired position.
3. Release the left mouse button to drop the column name to its new position in the list.
Customizing the Status Progress Bar Colors
The colors that are used to indicate the progress of the cases as displayed in the Status column may be customized by clicking on the color boxes to the right of each progress description and using the color selection tool to choose the color.

Persisting the Column and Screen Sizes and Position
The software can be configured to remember the column sizes and the application screen size and position. This means if these options are enabled, when the application is restarted, it will display the columns and application itself using the the most recently configured settings.
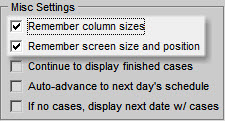
Display or Drop Finished Cases
You can configure the application to continue to display finished cases, or to drop cases from the display once they are completed.

Auto-Advancing to the Next Day's Schedule
Enabling this feature causes the display to automatically advance to the next day at midnight, rather than stay stuck on a particular date. This is probably the desired behavior of the application, since disabling this feature would require that someone manually change the date each day.
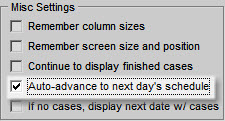
Displaying the Next Day With Cases
This feature causes the application to automatically advance to the next date that has cases. For example, if today there are no cases the application will keep advancing the date until it finds a date with cases. The most common situation in which this feature is useful is for weekends and holidays. Its not terribly useful to display a blank screen on a Saturday or Sunday if there are no cases on those days, so this feature would cause the application to automatically advance to the following Monday or whenever the next date is that there are cases.
